How to get out of Sandbox and increase AWS sending limits
Get out of AWS SES Sandbox and Increase Send Limit and/or Send Rate 2022
You began your journey with MailBluster for sending newsletters and configured Amazon SES API key successfully. But, right after registering a new AWS account, Amazon limits you to the “Sandbox” mode. Two things happen while your account is in the “Sandbox” – you can only send emails to verified email addresses, and the sending rate is limited to 200 emails per 24-hour period with a maximum send rate of 1 email per second. What’s next? You have to make a request to Amazon and provide some information to get out of it. Amazon will review the information you provided and decide whether or not to give you a green flag.
In this article, we will guide you throughout the process of requesting Amazon to increase the sending limit and get you out of the “Sandbox” step by step.
Here’s a video tutorial for you.
Steps to request AmazonSES to increase your sending quota
Before getting started, sign in to your AWS Console.
If you don’t have an AWS account yet, please visit Signing up free for AWS.
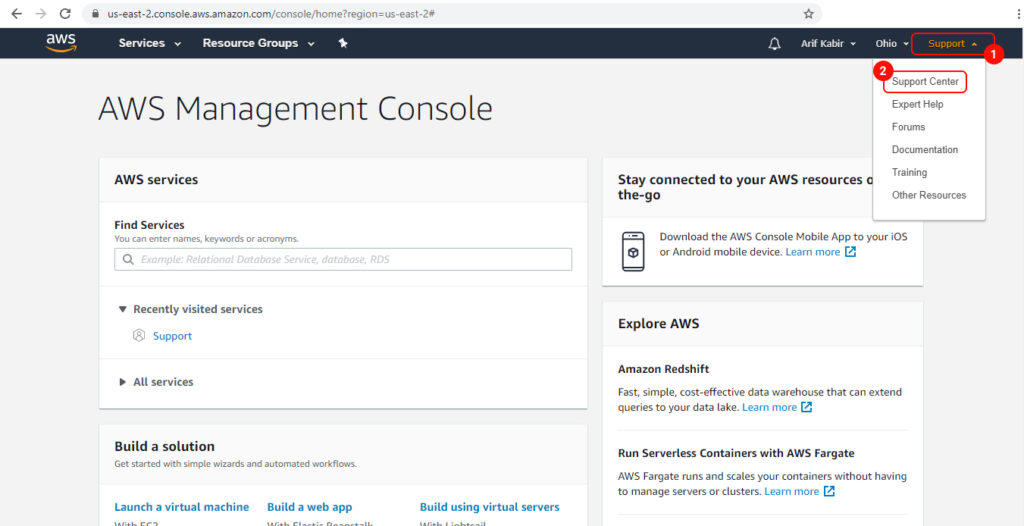
1 In the AWS Management Console, click on the “Support menu.”
2 Now select “Support Center” from the drop-down menu.
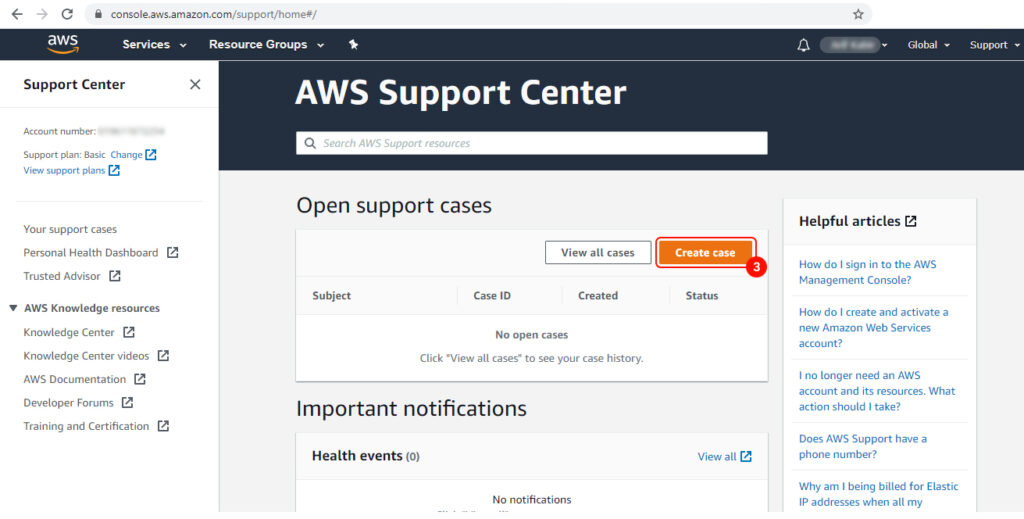
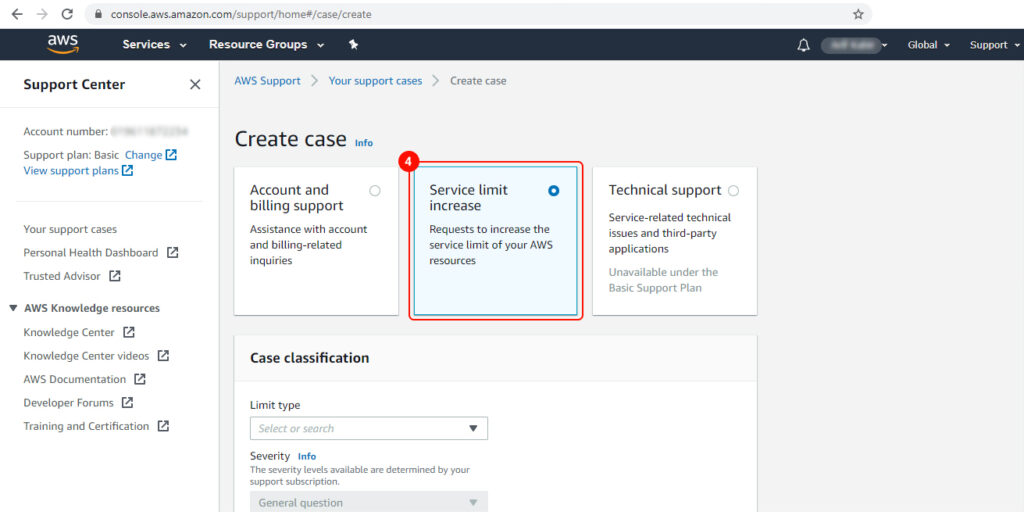
3 You are now in the “AWS Support Center” page. Click on the “Create case” button.
4 On the “Create case” section, select “Service limit increase.”
5 Then a panel named “Case classification” will show up. Select “SES Sending Limits” from the dropdown menu under “Limit Type.”
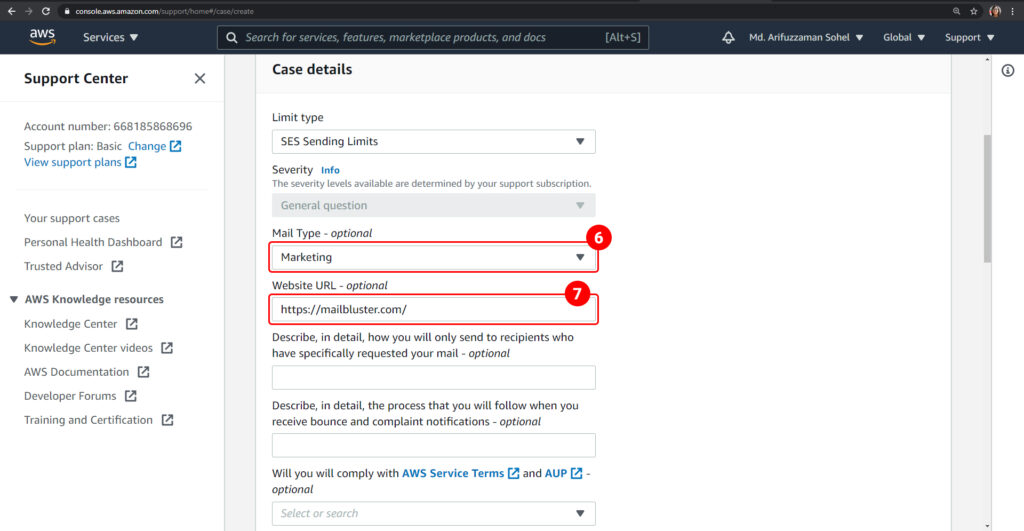
6 Choose the type of email that you want to send for “Mail Type.” For example, we selected “Marketing” here. If there are more than one value applies, choose the option that applies to most of the emails that you want to send.
7 Next, “Website URL”– type the URL of your business website. Providing the website’s URL will help AWS better understand the content you are sending. For example, here we have entered our website address:

8 In “How you will only send to recipients who have specifically requested your mail” – type your answer here. For example, “We send emails only to the registered users and to those who have subscribed to our messages. *(Make sure you only send emails to your registered users. Sending emails to random audience or purchased email list is neither allowed by MailBluster nor Amazon SES).
9 In “The process that you will follow when you receive bounce and complaint notifications” – type your answer in the textbox. Your response should be like this “MailBluster, the software we will be using to send emails through amazonSES will handle the bounce and complaint for us. For bounce: If the bounce is permanent, MailBluster unsubscribes the lead immediately. And no email will be sent in future to that address. If the bounce is not permanent, MailBluster just stores the response related to the bounce (like timestamp, type, subtype) for future use. For complaint: MailBluster unsubscribes the email address immediately. And no email will be sent in future to that address.”

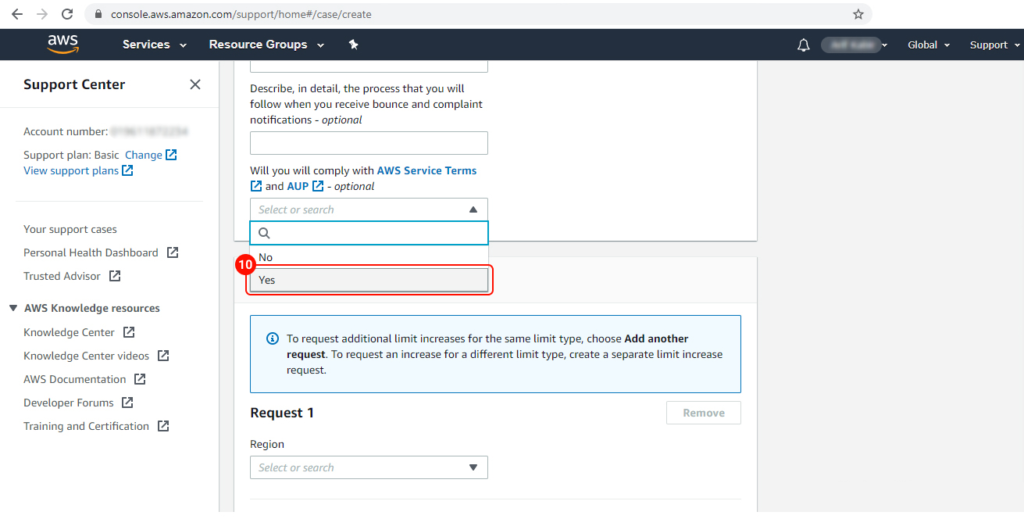
11 Under “Requests” for “Region” select the AWS Region in which you verified your email earlier and have configured MailBluster to use. For example, we’ve chosen – “US East (Northern Virginia)” here.

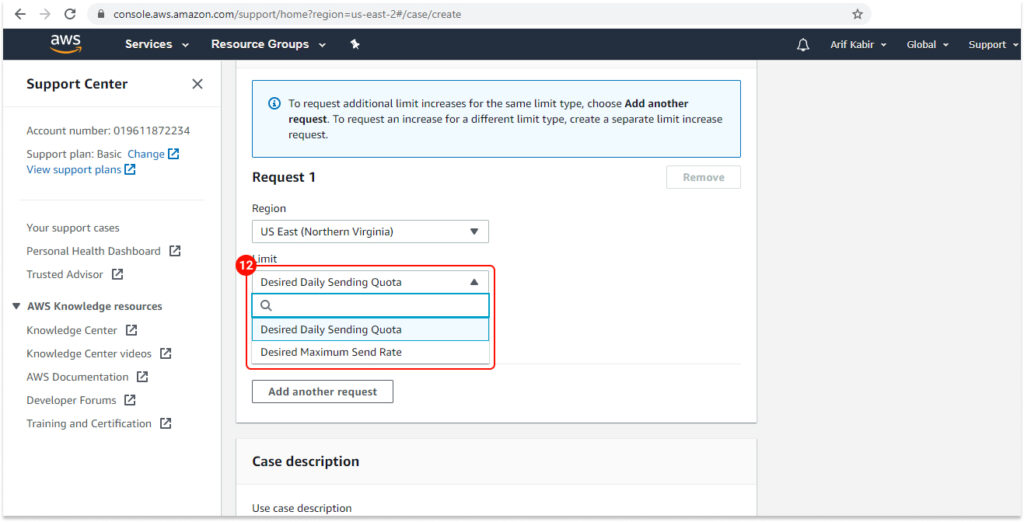
12 After selecting the “Region” you will see “Limit” choose the type of quota increment that you need to request. There are two options:
• Desired Daily Send Quota: You can select this option if you want to request an increment in the number of emails that can be sent from your account per 24-hour period in the specified region.
• Desired Maximum Send Rate: Select this option if you want to request for an increment to the number of emails your account will be able to send each second in that specified region.
We have chosen the “Desired Daily Sending Quota” for this case.
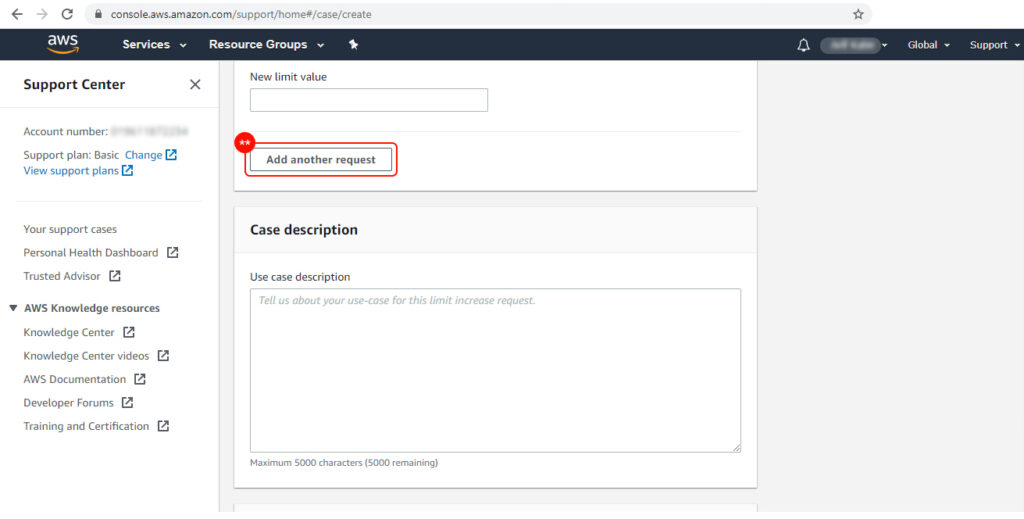
13 For “New limit value” enter the limit that you want to be increased. Request the amount that you think you’ll be in need of. Keep in mind, it is not ensured that you will receive the amount you require. For a new user, we suggest entering 50000, but you can enter a higher number according to your needs.

Note: You can request a “sending rate increment” at the same time by clicking the “Add Another Request” button. Since Amazon increases the sending rate automatically in accordance with the sending quota, we are skipping this now for simplicity.
Note: You can request a “sending rate increment” at the same time by clicking the “Add Another Request” button. Since Amazon increases the sending rate automatically in accordance with the sending quota, we are skipping this now for simplicity.
To help Amazon process your request, answer these questions below:
- How do you think you will build or acquire your email list?
- What is your plan for handling bounces and complaints?
- How can recipients unsubscribe your emails?
- What makes you choose the new sending rate or sending quota that you specified in this request?
*Tip: You can send a message like the following to the team AWS
Hello team AWS,
My official website is : [ Link of Business Website ], and over a while, I have collected email ids through subscriptions. The email ids are authentic and verified. I have been using other email service providers for a long time, and now I have decided to shift to Amazon SES.
I will use an email sending application, namely: https://mailbluster.com/ This application can effectively handle bounce, complaint, and un-subscription. And, it has been added to my verified email address in my Amazon SES account.
I hope you will approve my request for Amazon SES production access in the region mentioned above.
Let me know if you have any queries.
Cheers!
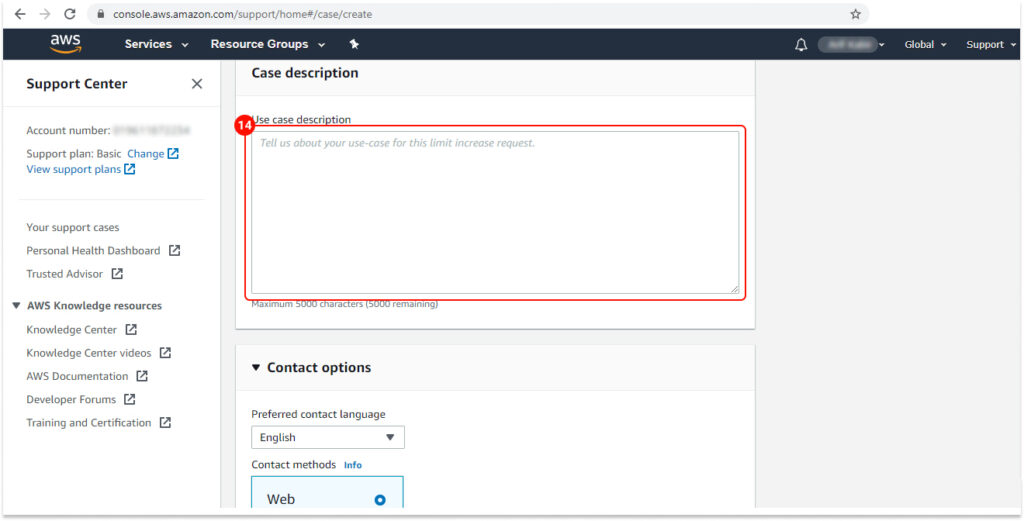
*Tip: If there’s additional information that you think Amazon needs to consider when evaluating your case, feel free to include that too.
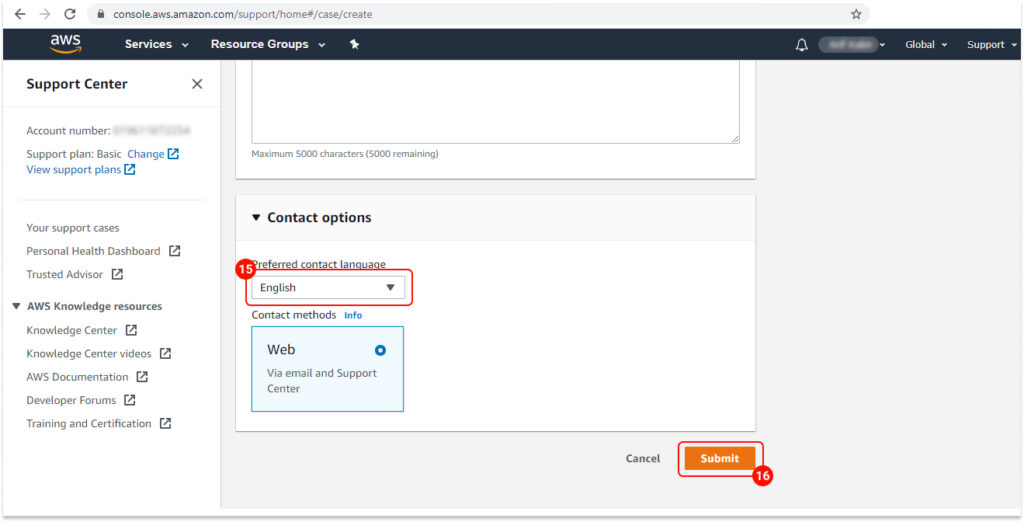
15 Under “Contact options” for “Preferred contact language” select the language you want Amazon to communicate with you. For example, we have selected “English” here.
16 When you are done, click “Submit.”
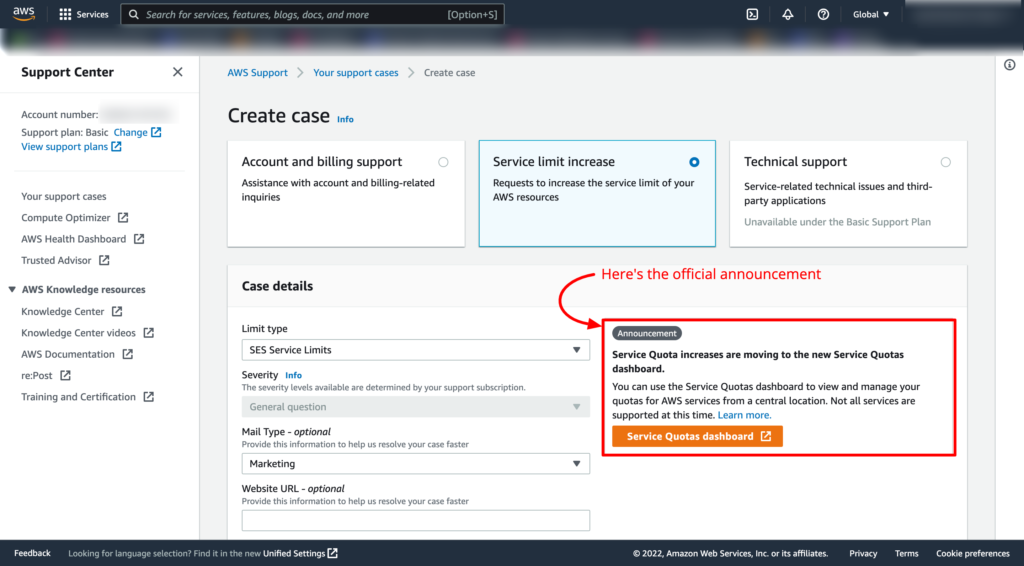
Update May 2022
AWS is moving Service Quota increases to the new Service Quotas dashboard. Here is the official announcement:
“You can use the Service Quotasdashboard to view and manage your quotas for AWS services from a central location. Not all services are supported at this time.”